


.png)
.png)
.png)
%201.png)
.png)
Hey, Jimmy - is it really always 5 o’clock somewhere? If not, it should be!
With this release, we’re focusing on empowering our customers to work smarter, not harder. Whether that’s through easier assessment preparation, restricting user visibility to the inputs relevant to their role, or automating scoring of select controls, CyberSaint is determined to make work-life balance less of a dream and more of your daily reality.
Keep reading below to see how the features we’ve added this quarter help you expedite your to-do list and get you one step closer to pouring yourself something tall and strong before the happy hour discounts are over.
Featured Updates:
Integrations
-
- AWS Integration
- Qualys Integration
Frameworks
-
- C2M2
User Management
- Preparatory User Assignment
- Hide Scores by User Role
Reporting
-
- NIST Risk Register CSV Export
Integrations
AWS Integration
Sure, the Tenable and Azure integrations are great, but do you know what would be AWSome? That’s right, an AWS integration.
AWS, also known as Amazon Web Services, is the second policy-based automation within CyberStrong. The design of the integration mimics that of our Azure integration, so if you paid close attention to the last blog update, you’ll have a leg up with this one.
To configure your AWS integration, follow the step-by-step guidance outlined below:
- Log into the CyberStrong platform as a user with Administrator access.
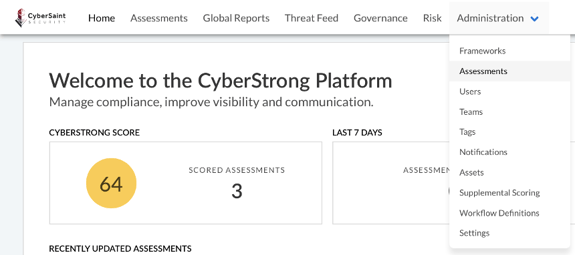
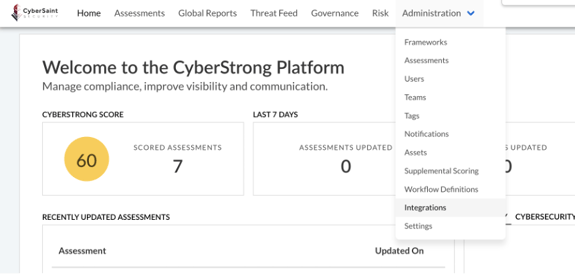
- Navigate to the ‘Administration’ tab within the home navigation bar and select ‘Integrations’ from the dropdown menu.

- Click on the ‘Amazon Web Services’ tab on the Integration Authentication page.
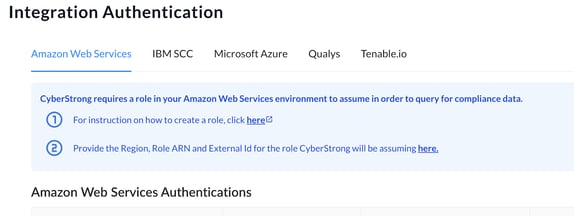
- Click the ‘here’ hyperlink in step #1 and follow the instructions to create a role.

For additional guidance on role permissions, leverage the AWS Integration Configuration Guide.
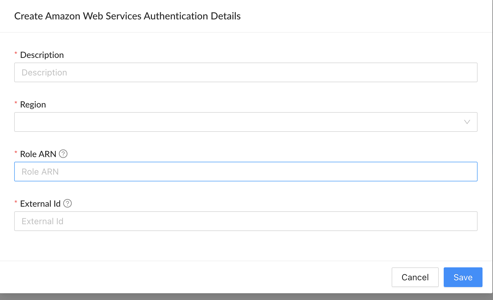
Note: If you don’t already have a copy of this document, please contact your dedicated Customer Success Manager or Implementation Specialist. - Once you have created a role, click the ‘here’ hyperlink in step #2 and populate the required AWS authentication details in the popup window. To submit your entries, click the blue ‘Save’ button at the bottom of the window.
Once you have configured your authentication source, you will see the authentication listed in the AWS Authentications table.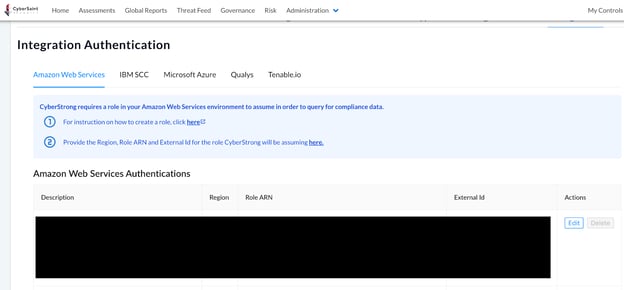
To apply the integration to a particular assessment, follow the step-by-step guidance below:
- Navigate to the ‘Administration’ tab within the home navigation bar and select ‘Assessments’ from the dropdown menu.
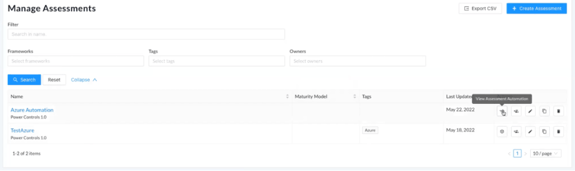
- Locate the assessment you want to automate within the assessments table and click the corresponding ‘Create Assessment Automation’ icon within the ‘Actions’ column.
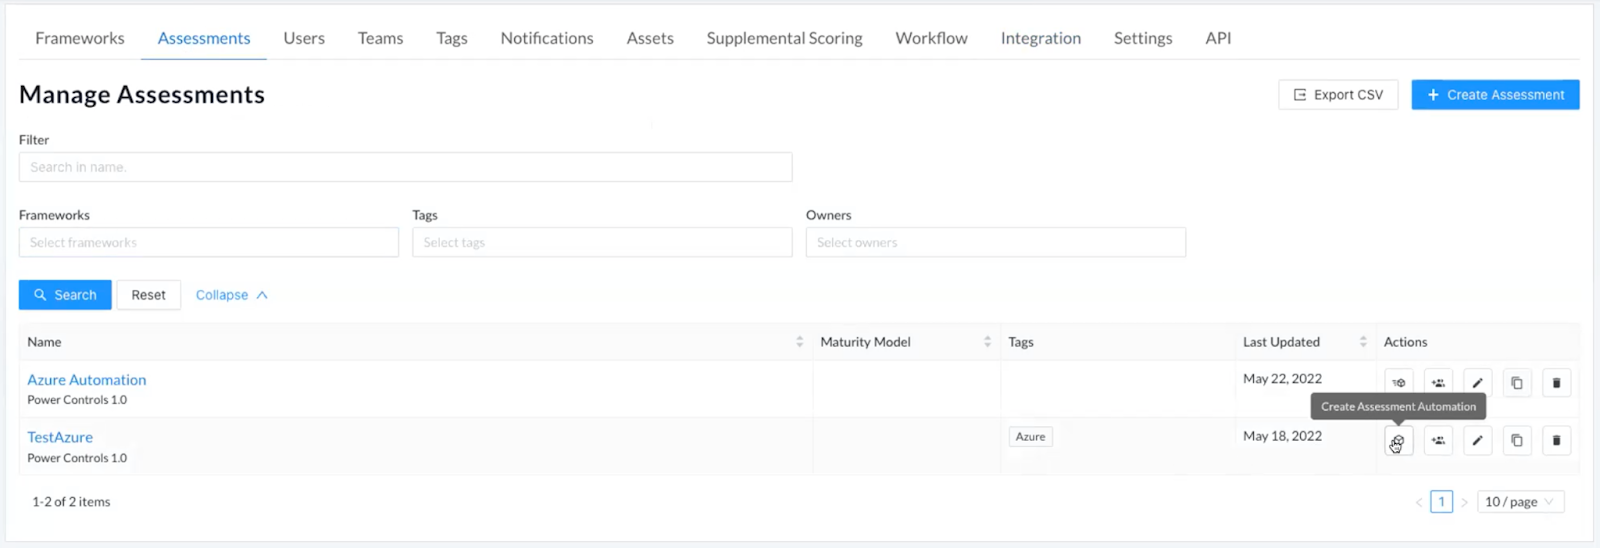
Note: Automation is currently only available for Action View frameworks, so the automation icon will not be visible alongside assessments leveraging a Control View framework. - Click the blue ‘+ Add Automation’ button in the top right corner of the page.

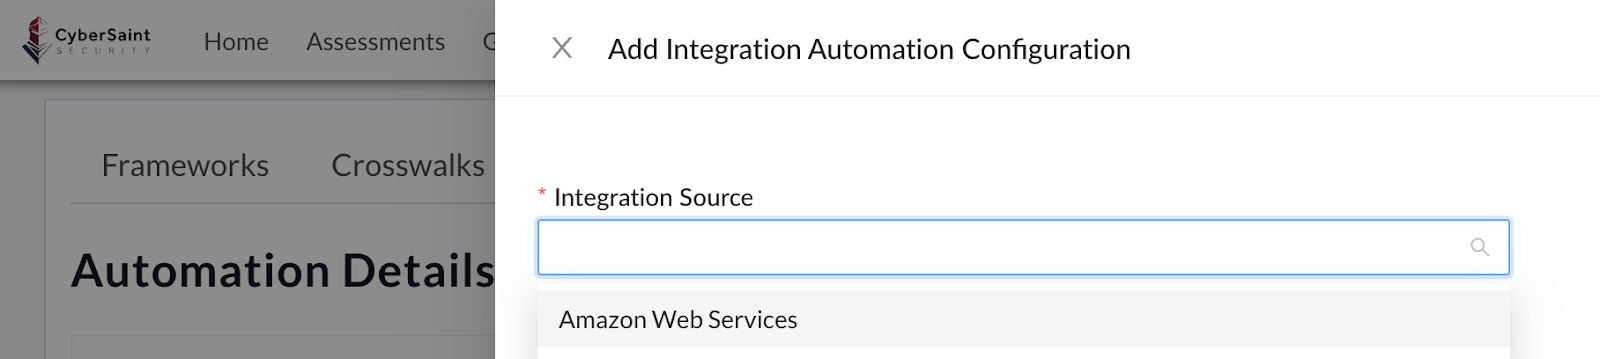
- Select ‘Amazon Web Services’ from the ‘Integration Source’ dropdown menu.
- Select the appropriate ‘Control Mapping Set’ and choose the appropriate ‘Authentication’ source, then click the blue ‘Submit’ button to submit your selections.
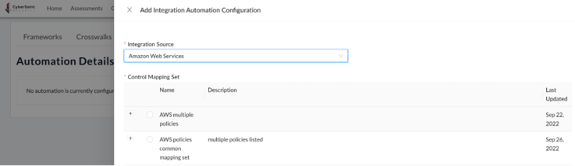
Note: If you don’t see a Control Mapping Set that meets your needs, please reach out to your designated Customer Success Manager or Implementation Specialist.
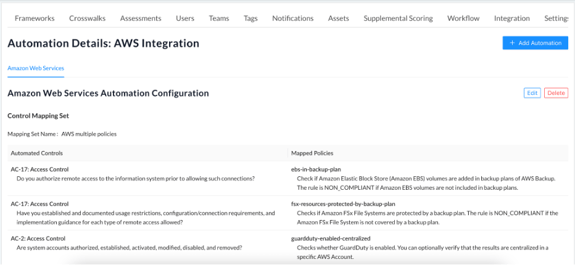
After submitting your selections, you will be brought to a summary page. On this page, you can edit or delete the configured automation using the respective buttons in the top right corner of the page.
Note: While CyberStrong allows you to host multiple AWS authentications within your environment, you can only tie one authentication source to a single assessment.
If you happen to navigate away from this page, you can return to it by clicking the ‘View Assessment Automation’ box icon from the ‘Actions’ column of the ‘Manage Assessments’ page (accessed via the ‘Administration’ tab).
Note: Once the automation is configured, CyberStrong will sync with AWS once per day.
Within an assessment, control actions that are automated by AWS will be marked with a blue banner that reads, “This control has been automated by AWS. Score updates will be handled automatically.”
Previously, the ability to manually select the current AND target score were disabled and the response options were grayed out. With this release, Target Score is no longer locked and can be updated manually. 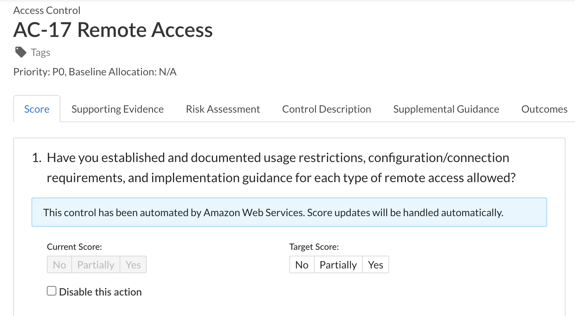
If a response option has not been selected when the automation is run, the Target Score will automatically be set to the next best response option relative to the Current Score. For example, if the Current Score is ‘No’ and Target Score has not been selected manually, it will automatically be set to ‘Partially’.
If the Target Score has been set manually, the automation will not overwrite the manual selection when run.
As before, you can click on the ‘Amazon Web Service’ tab below the response options and to the right of the Annotation/POAM tab to view the policies associated with the control action, when they were last assessed, and the associated compliance value.
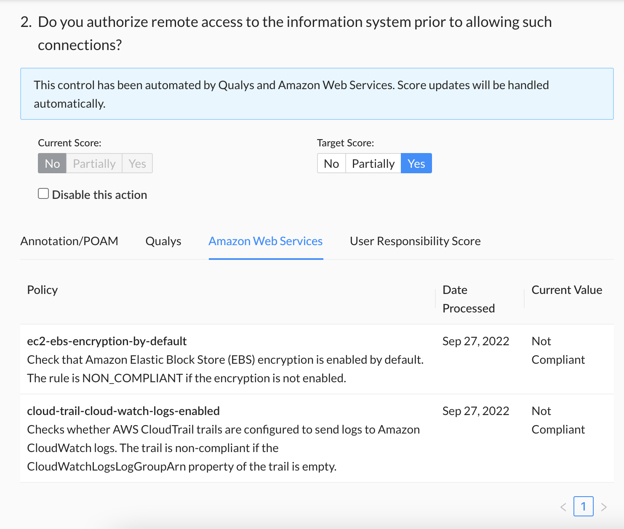
Note: If any one of the policies associated with a control action is not compliant, the control action will receive the lowest possible score as grading is performed as an all-or-nothing, pass/fail. Conversely, the control action will receive the highest score if all policies are compliant.
Qualys Integrations
Does anyone else think Qualys missed a prime opportunity to have a hacker-Esque koala in a hoodie as their logo? Ya know, because koalas have all the right koalafications for fighting cybercrime. Koala, Qualys….Yikes. Are we hiring dads as ghostwriters now? That was cheesy, even for us
Anyhoo, Qualys is the fourth automation to be added to the CyberStrong platform and the second vulnerability scan integration. The design of the integration mimics that of our Tenable.io integration, so again, if you paid close attention to the last blog update, you’ll have a leg up.
To configure your Qualys integration, follow the step-by-step guidance outlined below:
- Log into the CyberStrong platform as a user with Administrator access.
- Navigate to the ‘Administration’ tab and click ‘Integrations’ from the dropdown menu.
- Click on the ‘Qualys’ tab on the Integration Authentication page.

- Within the blue instructions box at the top of the page, click the ‘here’ hyperlink in step #1 and follow the instructions to select the appropriate API URL to use based on your Qualys platform.
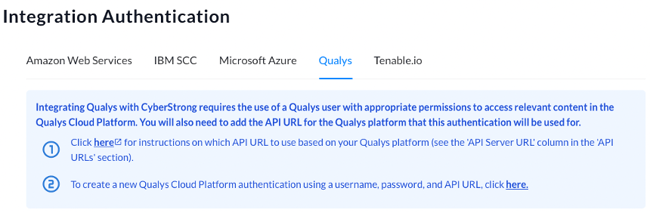
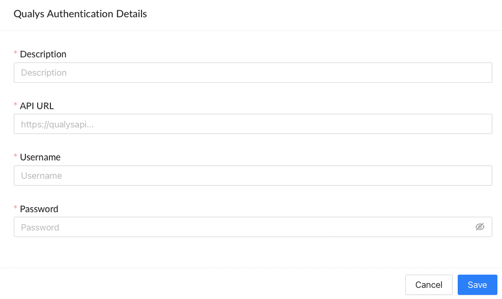
- Once you have selected your API URL, click the ‘here’ hyperlink in step #2 and populate the required Qualys Cloud Platform authentication details in the popup window. To submit your entries, click the blue ‘Save’ button at the bottom of the window.
To apply the integration to a particular assessment, follow the step-by-step guidance below:
- Navigate to the ‘Administration’ tab within the home navigation bar and select ‘Assessments’ from the dropdown menu.

- Locate the assessment you want to automate within the assessments table and click the corresponding ‘Create Assessment Automation’ box icon within the ‘Actions’ column.
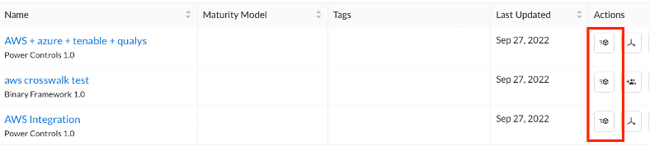
Reminder: Automation is currently only available for Action View frameworks, so the automation icon will not be visible alongside assessments leveraging a Control View framework.
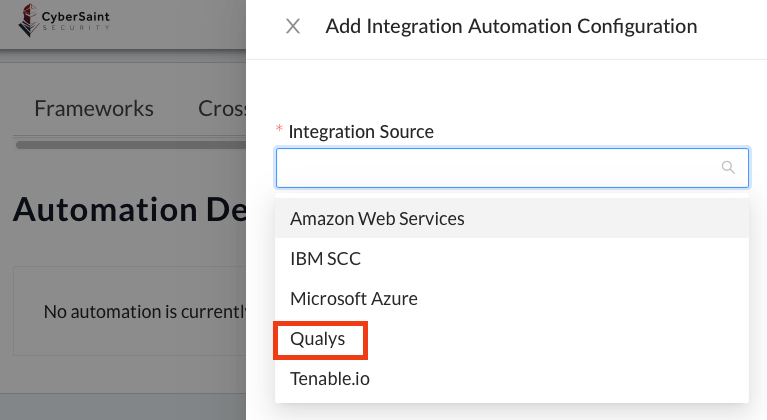
- Click the blue ‘+ Add Automation’ button in the top right corner of the page.

- Select ‘Qualys’ from the ‘Integration Source’ dropdown menu.
- Select the appropriate ‘Vulnerability Scan Template’, choose the ‘Threshold (in Days)’, choose the appropriate ‘Authentication’ source, then click the blue ‘Submit’ button.
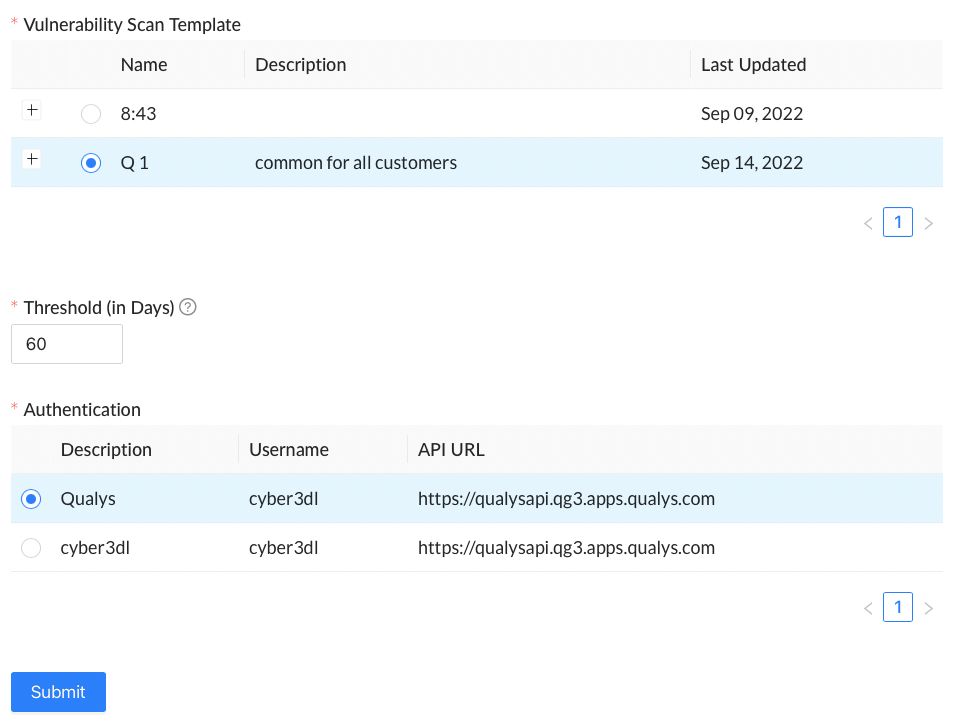
Note: If you don’t see a Vulnerability Scan Template that meets your needs, please reach out to your designated Customer Success Manager or Implementation Specialist.
After submitting your selections, you will be brought to a summary page. On this page, you can edit or delete the configured automation using the respective buttons in the top right corner of the page.
Note: While CyberStrong allows you to host multiple Qualys authentications within your environment, you can only tie one Qualys authentication source to a single assessment.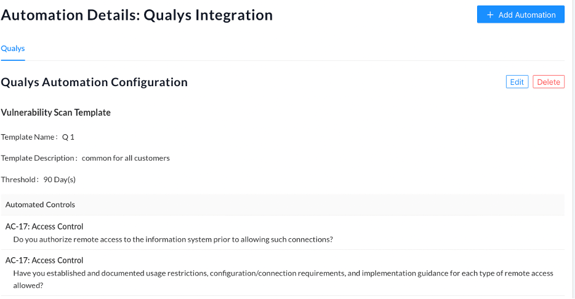
If you happen to navigate away from this page, you can return to it by clicking the ‘View Assessment Automation’ box icon from the ‘Actions’ column of the ‘Manage Assessments’ page (accessed via the ‘Administration’ tab).
Note: Once the automation is configured, CyberStrong will sync with Qualys once per day.
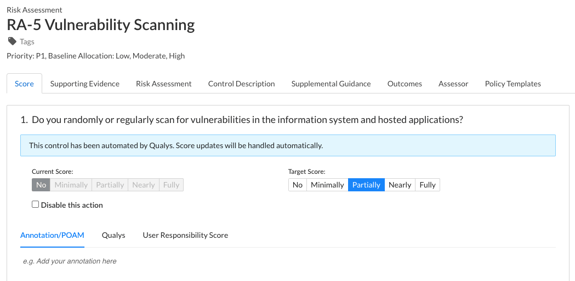
Within an assessment, control actions that are automated by Qualys will be marked with a blue banner that reads, “This control has been automated by Qualys. Score updates will be handled automatically.”
As was the case with the AWS integration, Target Score can be updated manually, as shown below:
If a response option has not been selected when the automation is run, the Target Score will automatically be set to the next best response option relative to the Current Score. For example, if the Current Score is ‘No’ and Target Score has not been selected, it will automatically be set to ‘Partially’.
If the Target Score has been set manually, the automation will not overwrite the manual selection when run.
To view information pertaining to the Qualys scans, click on the ‘Qualys’ tab below the response options and to the right of the Annotation/POAM tab.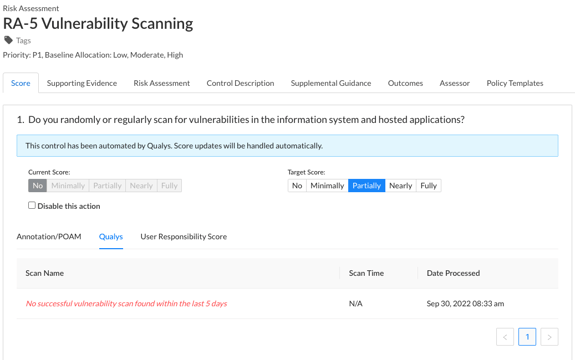
Note: If the most recent scan result shows “no successful vulnerability scan found within (time parameter)”, the control action will receive the lowest possible score as grading is performed as an all or nothing, pass / fail. Conversely, the control action will receive the highest score if a successful scan is detected.
Frameworks
C2M2
🎵♪🎵♪
Young man, young man, there's no need to feel down
Young man, young man, pick yourself off the ground
C2M2, it's fun to assess with C2M2
🎵♪🎵♪
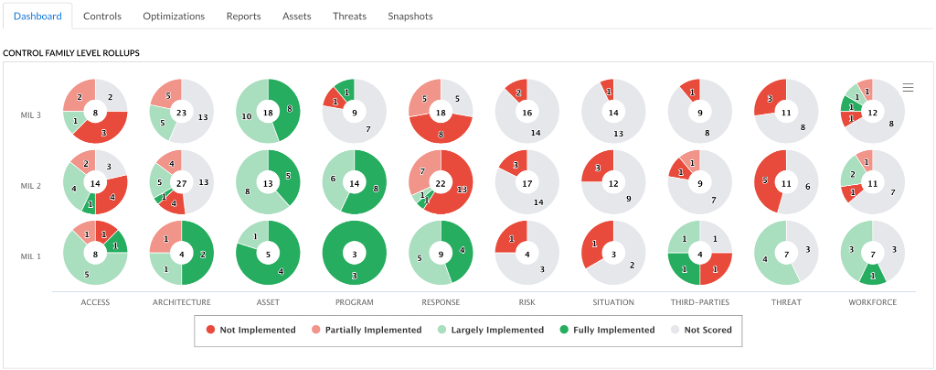
In June, the US Department of Energy released the most recent version of the Cybersecurity Capability Maturity Model (C2M2). The CyberStrong solution now natively supports this updated version and displays the implementation graphics for each domain on the assessment dashboard.
Although published by the DOE for the Energy sector, organizations of any industry are welcome to use this comprehensive framework and its accompanying maturity model.
Documentation on the model can be found here, and a self-evaluation guide is available here.
The C2M2 model is organized as follows:
- 10 Domains
- Each Domain is comprised of a number of Objectives
- Each Objective comprises one or more Practices, for a total of 342
- Each practice is designated with a Maturity Indicator Level (MIL)
Scoring occurs at the Practice level, with 4 options having a numerical value of either 0 or 1:
- Not Implemented (0)
- Partially Implemented (0)
- Largely Implemented (1)
- Fully Implemented (1)
Each Objective has a designated Maturity Indicator Level (MIL1, MIL2, or MIL3). The completion state of each practice with an objective determines the MIL level of that objective.
- MIL0 if no practices are complete
- MIL1 if all MIL1 practices are complete, but one or more MIL2 practices are incomplete
- MIL2 if all MIL1 and MIL2 practices are complete, but one or more MIL3 practices are incomplete
- MIL3 if all MIL1, MIL2, and MIL3 practices are complete
The following screenshot demonstrates the visual representation of scoring for each Domain by MIL level.
User Management
Preparatory User Assignment
When has being proactive ever been a bad thing? Premature… Well, we won’t go there, but being proactive - especially when it comes to risk management, is always a good thing.
With this release, gone are the days of assessment owners having to wait ages for their teams to log in to the platform for the first time and sending them reminder email after reminder email to verify their accounts before they can start assigning out controls.
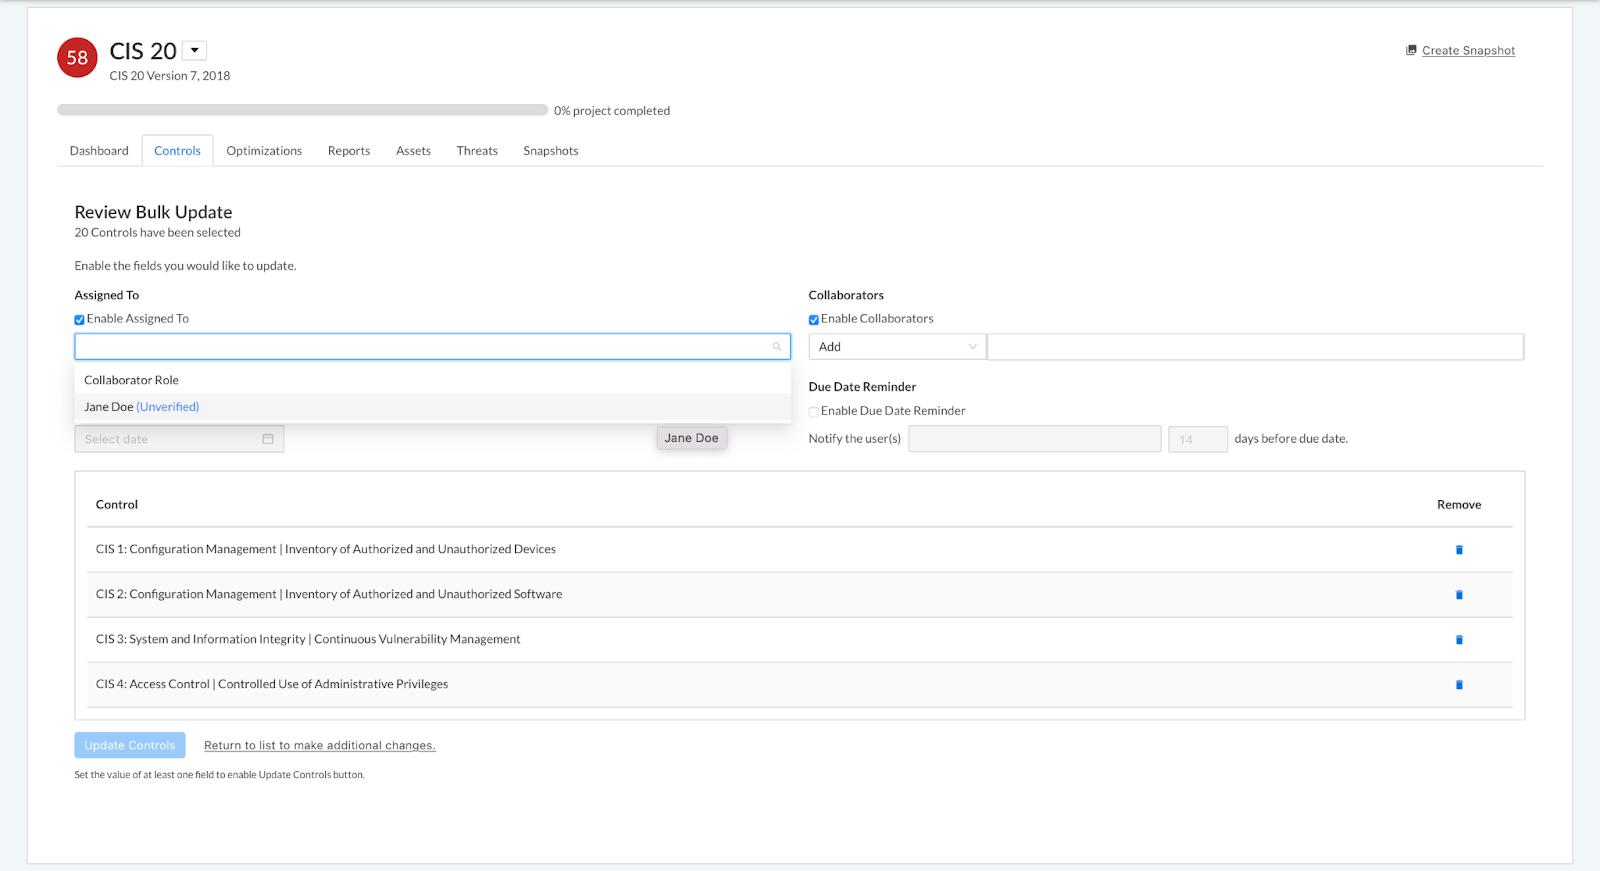
Now, immediately after creating a user in the platform, you can assign them as Owners and Collaborators on an assessment. When adding an unverified user to a control or an assessment (either via the Score tab of a control or via bulk update), their account status within the platform will be displayed in parentheses to the right of their name in blue text, as shown below, to indicate they have not logged in and completed the account verification process.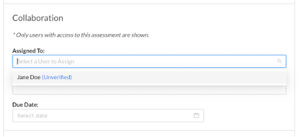
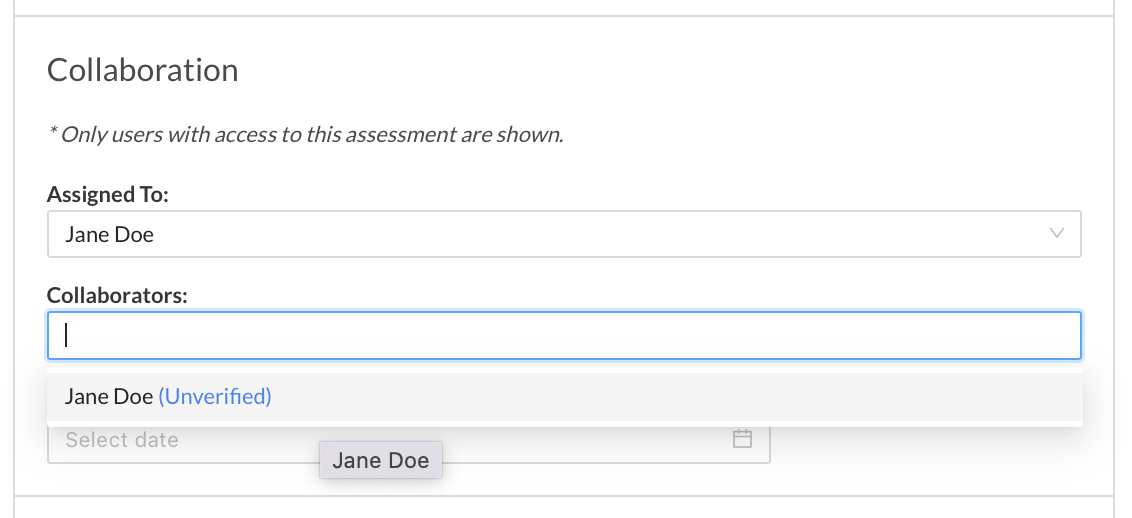
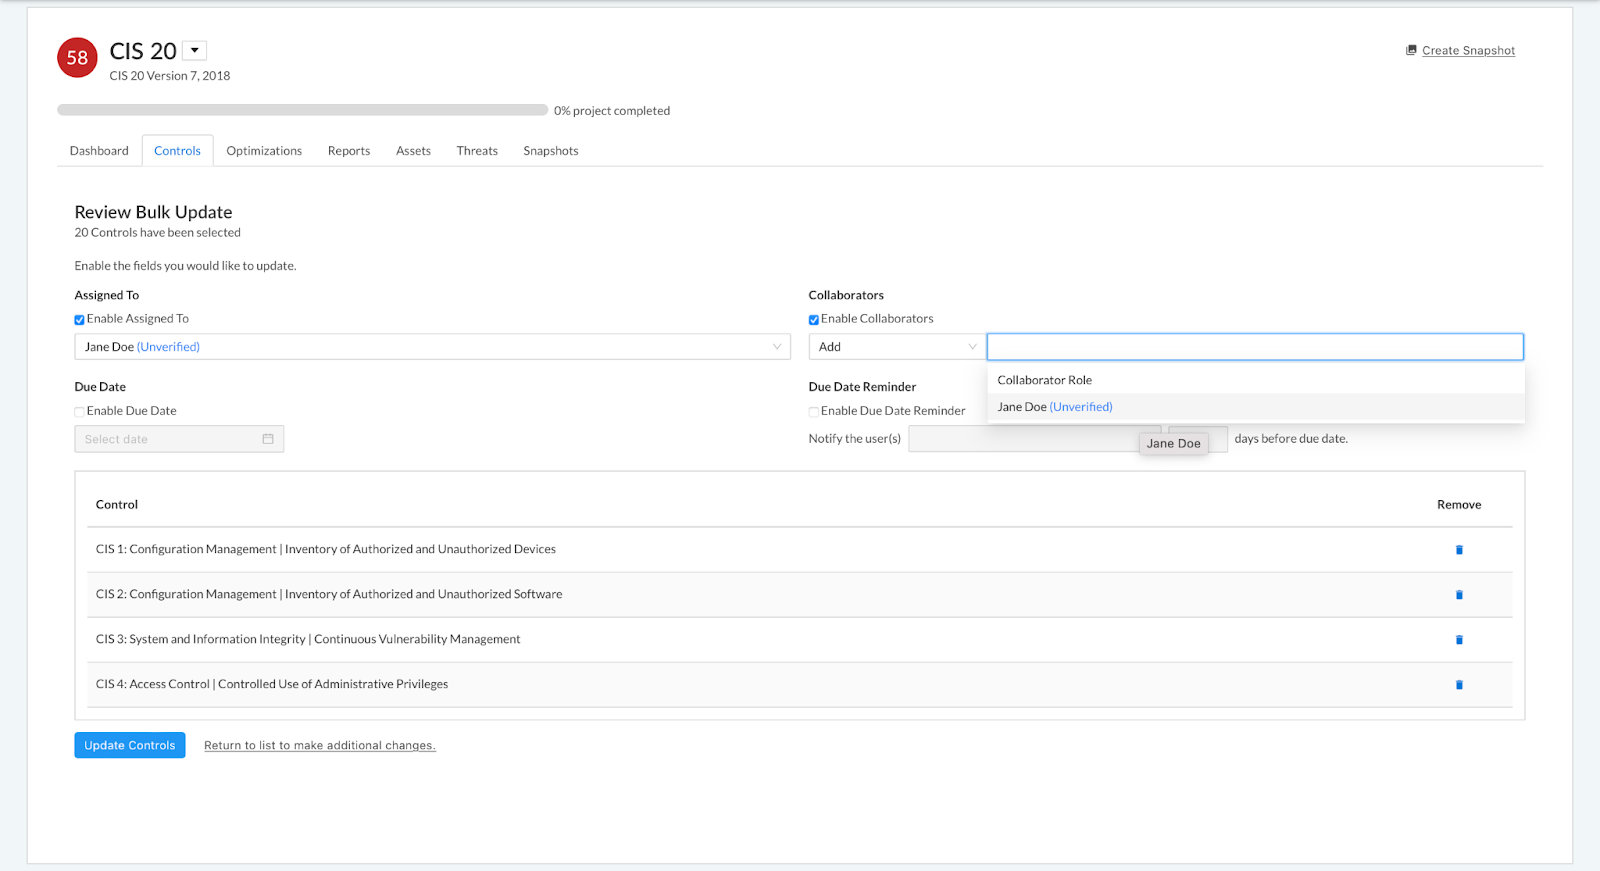
Note: Unverified users will not receive email notifications of their assignments until they have completed the account verification process. Once the user is verified, email notifications will resume. If they have been assigned controls prior to their first login, they will receive a single summary email detailing their assignments.
Hide Scores by User Role
Silly rabbit, Trix are for kids! We get it, current and target scores aren’t always meant to be shared with the target of an assessment. Whether you’re performing an audit or conducting a standard assessment, hiding your Trix from a few of your rabbits can help preserve the integrity of responses. With the latest release, you can do just that.
Note: This feature is applied at the framework level - meaning all assessments leveraging a particular framework will adhere to the field configuration settings of that framework.
Scores can be hidden/unhidden at any time. If you change your mind or want to reveal scores to select users once an assessment has concluded, you can do so by toggling the appropriate fields back on.
Follow the step-by-step guidance below to hide current and/or target scores from select user roles for a particular framework:
- Navigate to the ‘Administration’ tab within the home navigation bar and select ‘Frameworks’ from the dropdown menu.
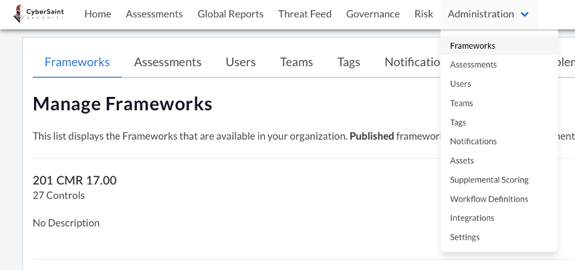
- Locate the framework you want to hide scores for and select ‘Manage Framework’ from the ‘Actions’ dropdown menu.

- From the ‘Manage Framework’ page, navigate to the ‘Field Configuration’ tab to the right of the ‘Metadata’ tab.
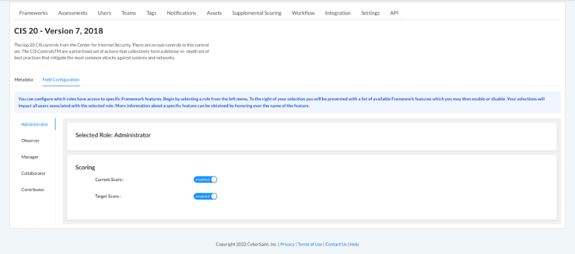
- Select the appropriate user role from the menu on the left-hand side of the page.
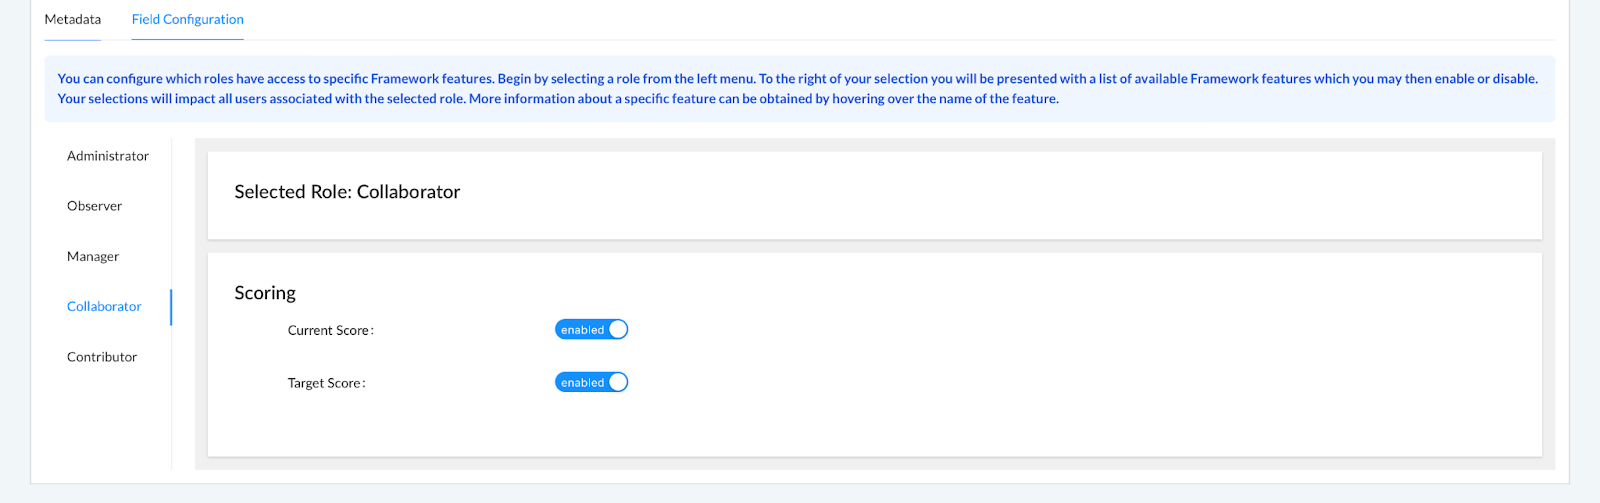
- Hide the current score or target score by using the corresponding blue toggle options.
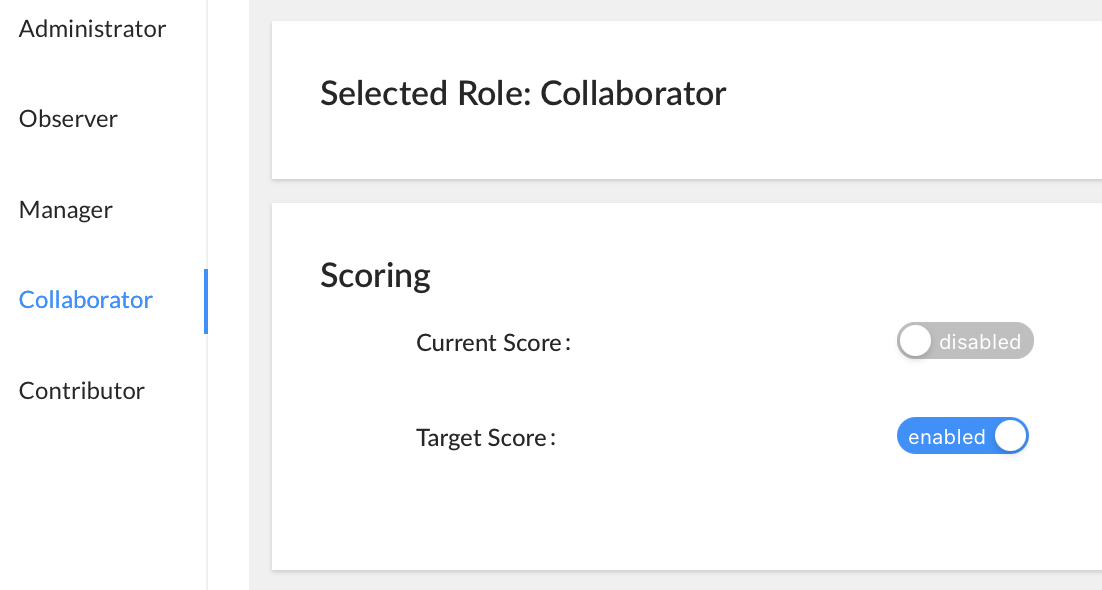
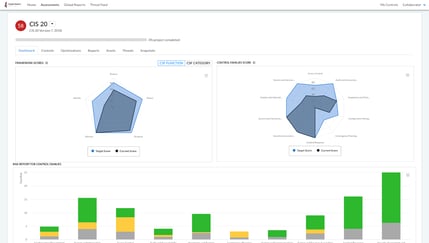
As an example, the following screenshots demonstrate how certain aspects of the platform appear to a user with Collaborator-level privileges before and after the Current Score field has been hidden.
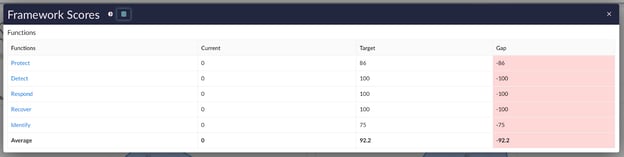
Assessment dashboard before and after hiding current score
Before
After
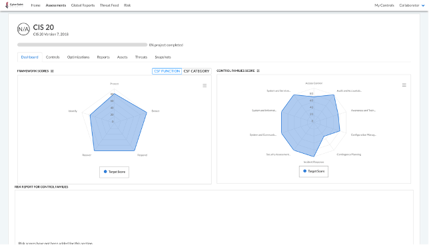
Note the following changes:
- CyberStrong score in the upper left corner is now shown as N/A.
- Current scores have been removed from the Framework Scores and Control Families Scores graphs.
- The Risk Report for Control Families chart is no longer visible.
Hidden scores within the expanded tabular views of the Framework Scores and Control Families Scores graphs will be reflected as 0.
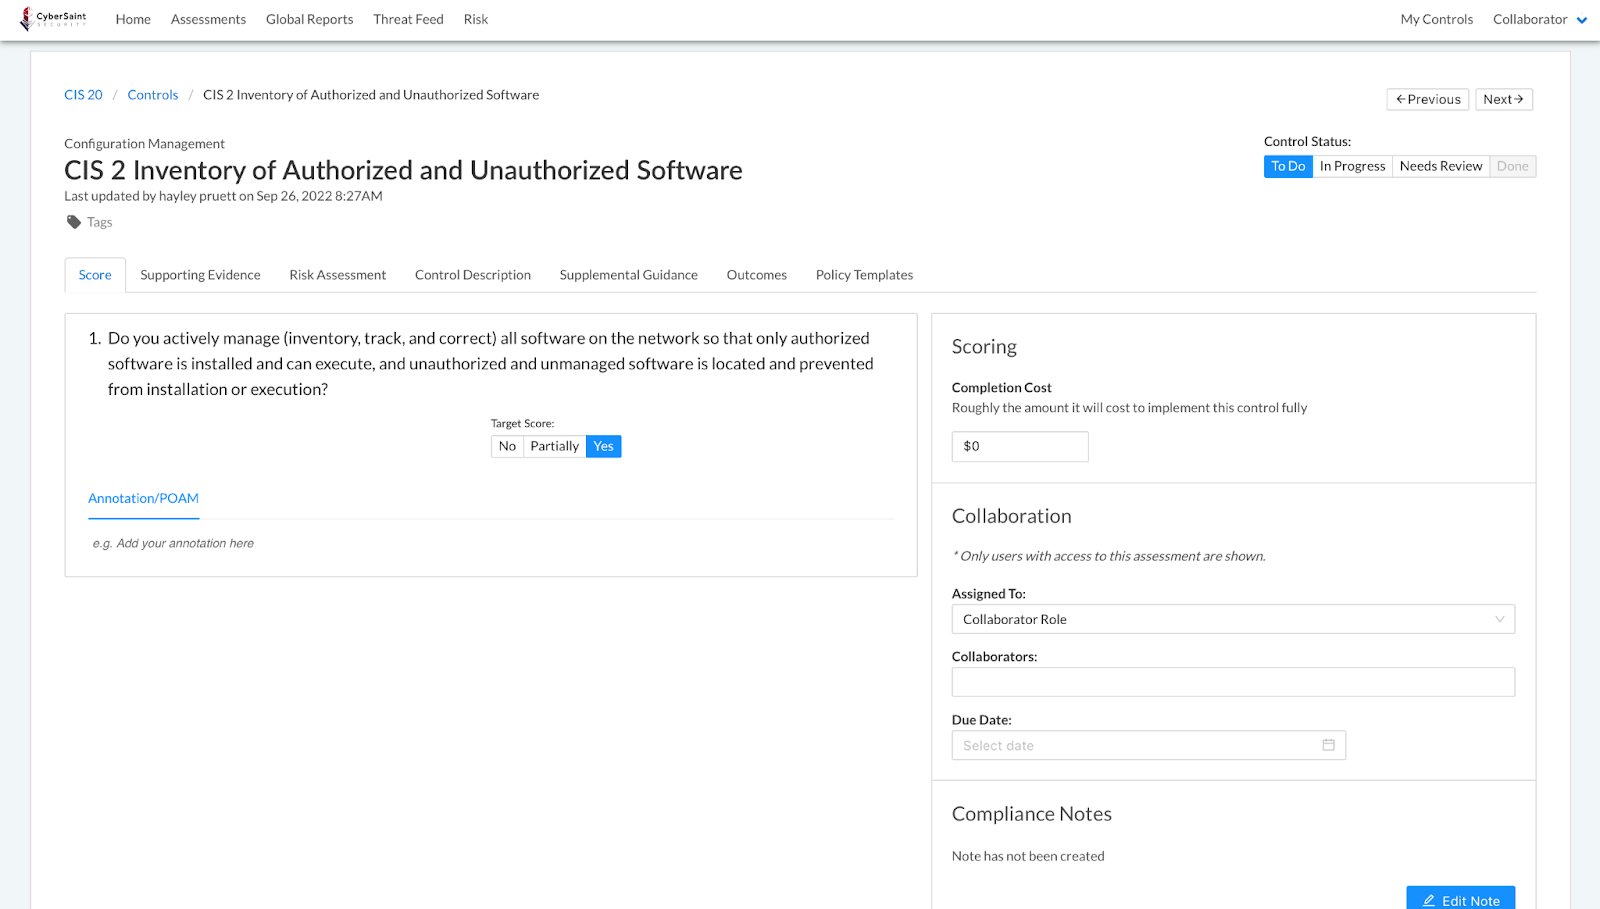
Control page before and after hiding current score
Before
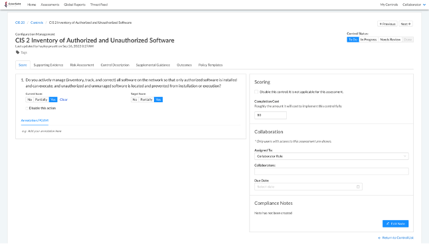
After
NIST Risk Register dashboard before and after hiding current score
Before
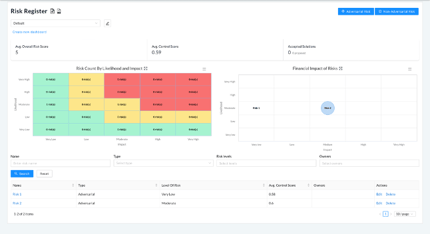
After

Note the following changes:
- If any risks have associated controls with hidden current scores, the Avg. Control Score for the whole risk register dashboard (located above the heatmap) will be shown as N/A.
- If a risk has associated controls with hidden current scores, the Avg. Control Score for that risk within the table below the charts will be shown as N/A.
NIST risk dashboard for a particular risk before and after hiding current score
Before
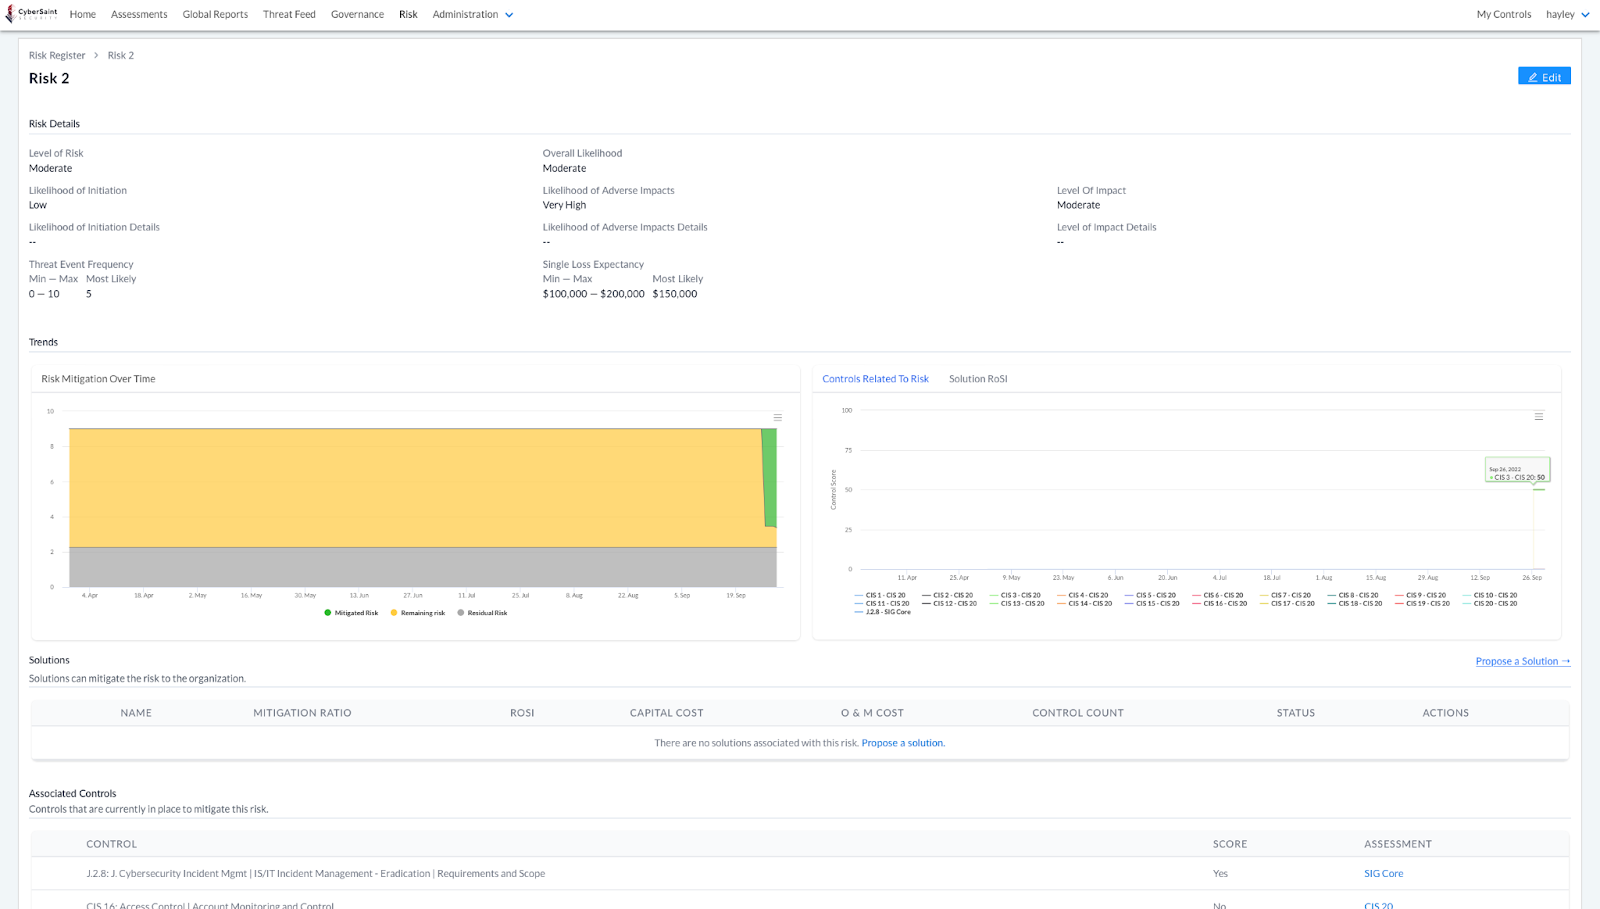
After

Note the following changes:
-
-
- If the current score is hidden for all controls associated with a risk, the Risk Mitigation Over Time graphic will only display data tied to Residual and Remaining Risk; data for Mitigated Risk will be hidden.
-- If one or more of the controls associated with a risk is from a framework in which the user has access to the current score, the Risk Mitigation Over Time graphic will display Residual, Remaining, and Mitigated risk data, but only for the controls whose scores are not hidden to the user.
- If the current score is hidden for all controls associated with a risk, the Risk Mitigation Over Time graphic will only display data tied to Residual and Remaining Risk; data for Mitigated Risk will be hidden.
-
- If the current score is hidden for all controls associated with a risk, the Controls Related to Risk graphic will be hidden and the window will display the following message, “No controls have been added to this risk or they have not been scored. To see how control data has changed over time, add controls to the risk and score them.”
-- If one or more of the controls associated with a risk is from a framework in which the user has access to the current score, the Controls Related to Risk graphic will be visible; however, it will only display data for the controls whose scores are not hidden to the user.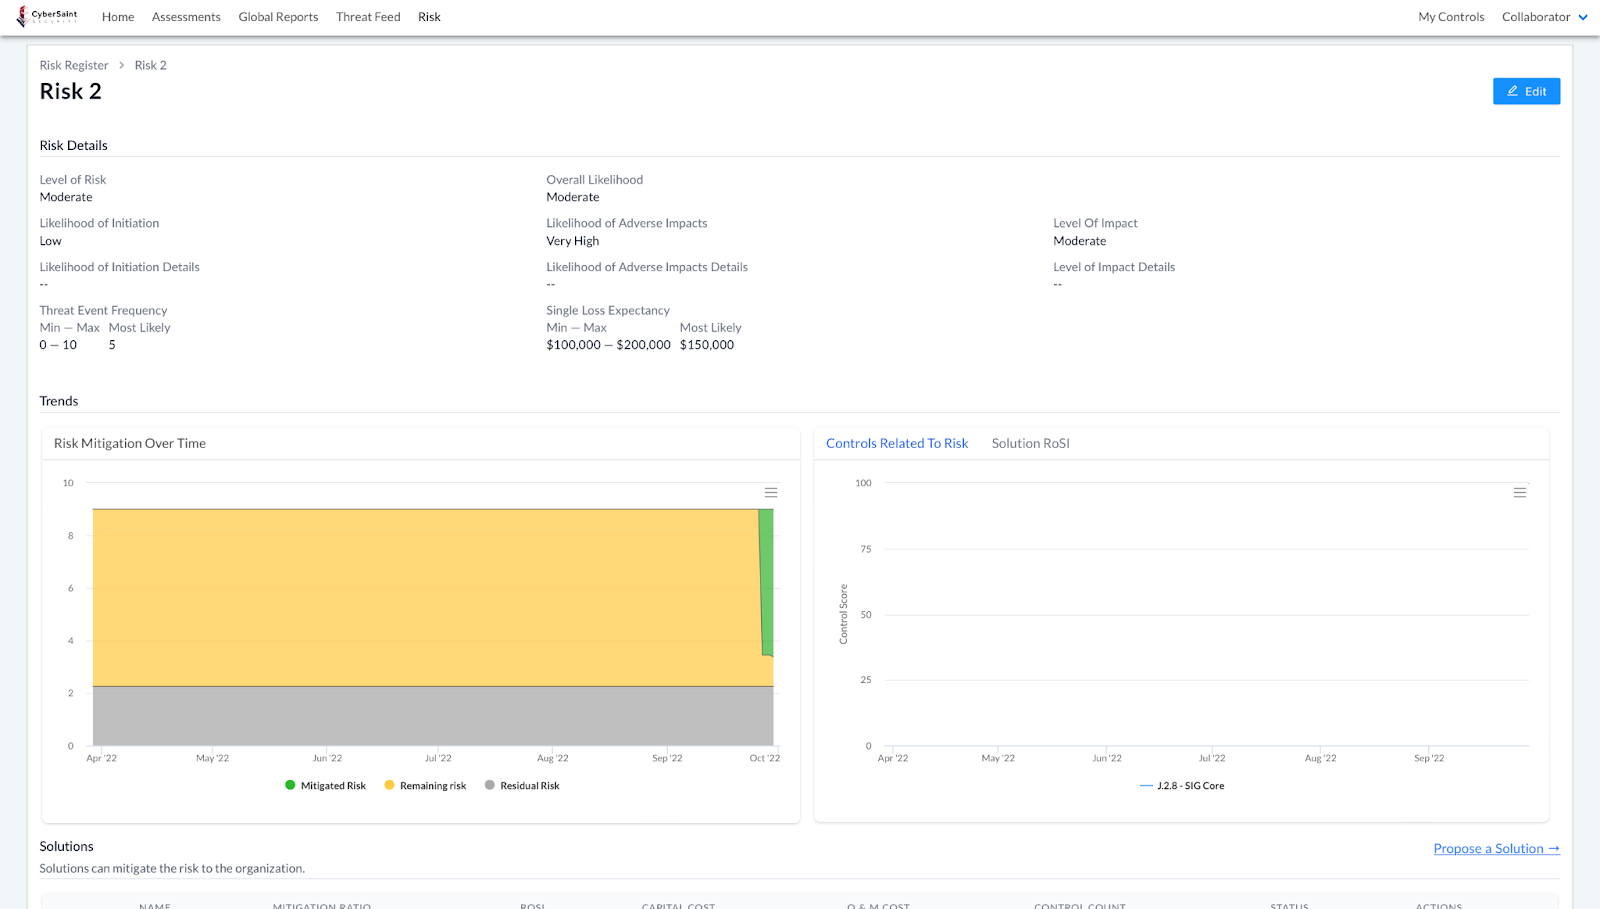
FAIR Risk Register dashboard before and after hiding current score
Before
After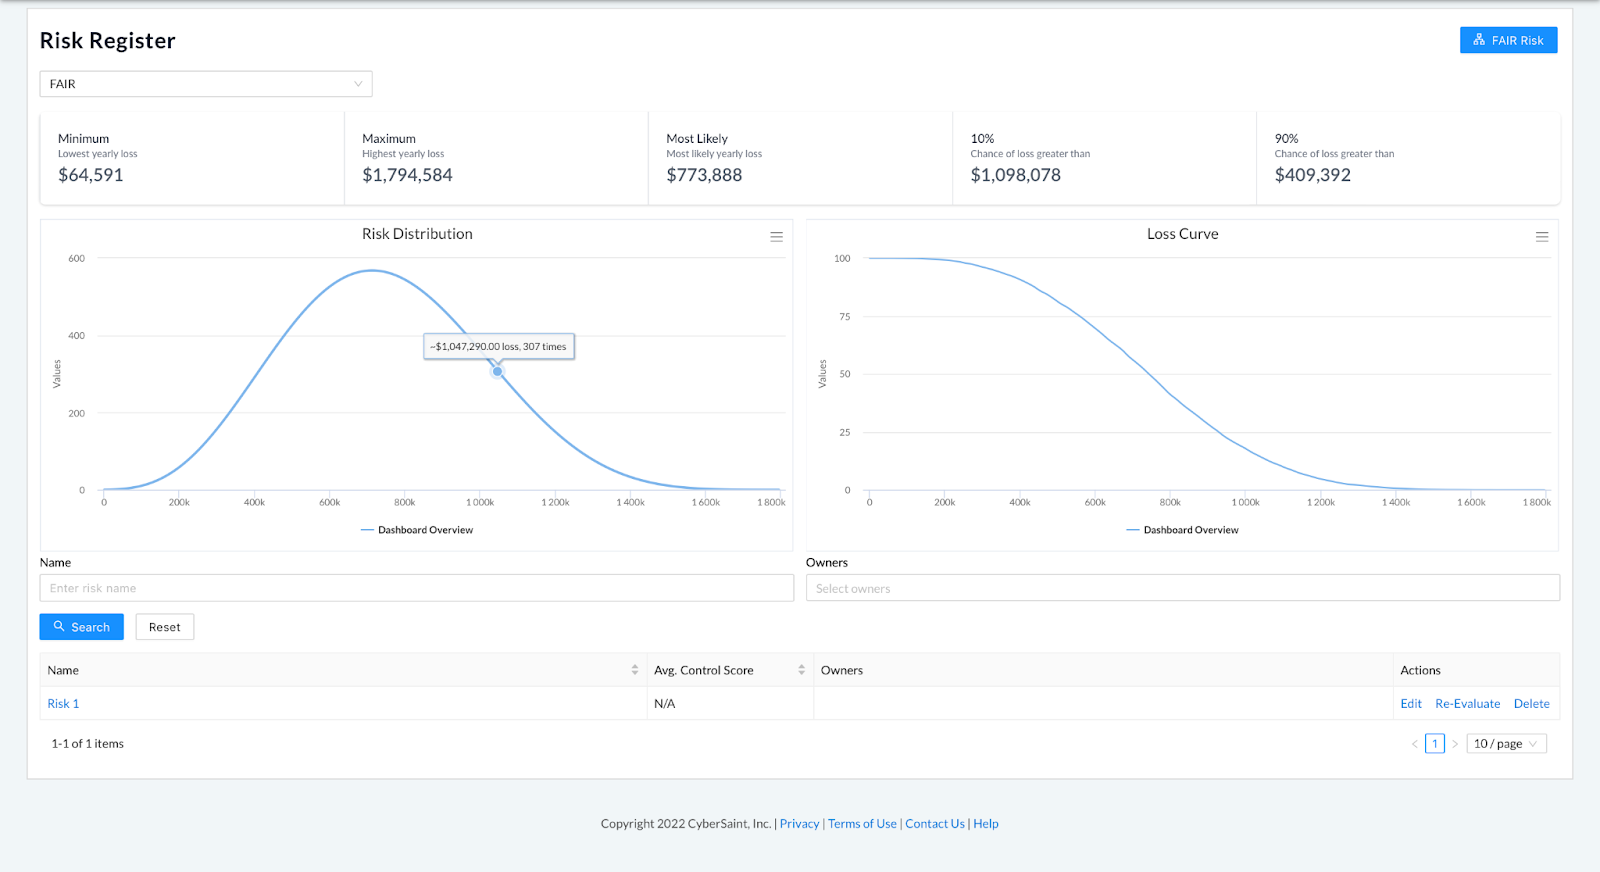
FAIR risk dashboard for a particular risk before and after hiding current score
Before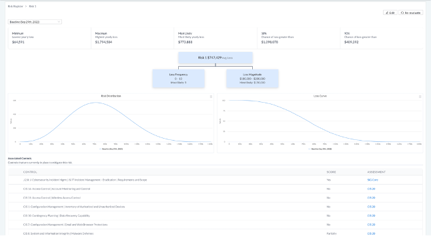
After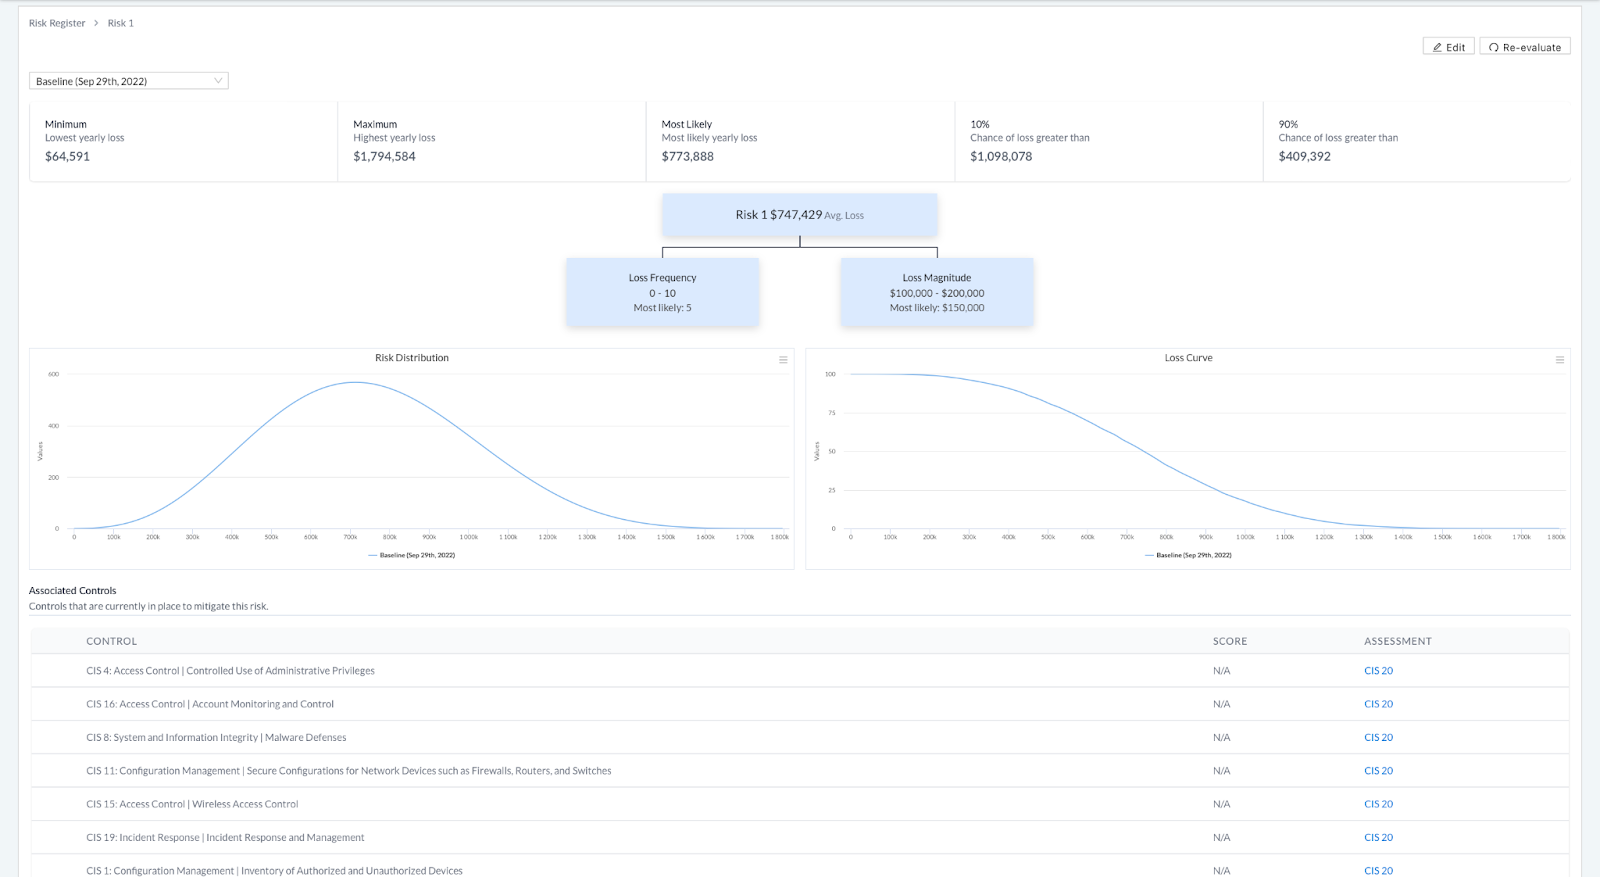
My Controls before and after hiding current score
Before
After

Note: If a user is assigned controls from multiple frameworks, the ‘Score’ column will appear in the ‘My Controls’ tab; however, ‘Score’ cells corresponding to controls whose current score has been hidden from the user will appear blank.
When scores are hidden, users are still able to add evidence and annotations, as shown below: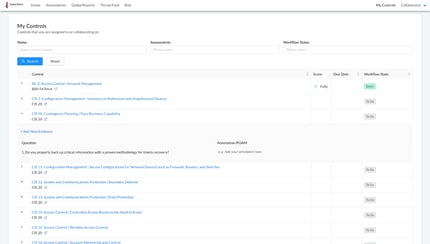
Reporting
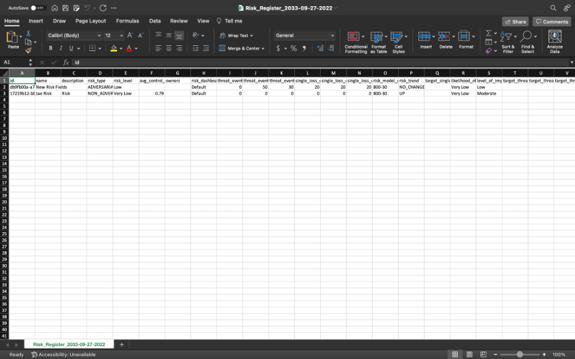
NIST Risk Register CSV Export
Tell me more, tell me more
Like were you up all night?
Tell me more, tell me more
Are you sure this is right?
If your c-suite is full of Sandy’s, Danny’s, Rizzo’s, and Kenickie’s, they may be singing this song during your next risk presentation. As the threat landscape expands and cyber attacks continue to rise, the c-suite and the board are becoming increasingly cyber-literate. Equipped with more knowledge than ever before, they’re looking at their cyber risk programs through a more skeptical lens, challenging metrics, asking tougher questions, and demanding evidence.
If you’re a CISO or someone responsible for this kind of reporting, you don’t want to walk into that meeting empty-handed. Cue the risk register export feature. With this release, users with access to the risk register can now export their register and all its underlying data into a CSV file.
Note: This export feature is only available for our standard NIST-based risk register and does not apply to our FAIR dashboards.
To export a copy of your risk register, follow the step-by-step guidance outlined below:
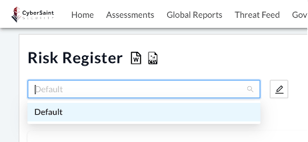
- Log into the CyberStrong platform as a user with access to the risk register and navigate to the ‘Risk’ tab within the home navigation bar.

Note: This feature is not available for users with Observer-level permissions. - Select the NIST-based dashboard you wish to export from the dropdown menu in the top left corner of the page.
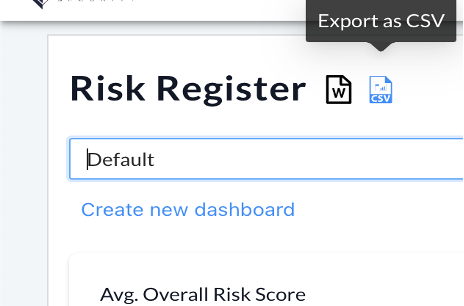
- Click the CSV icon located to the right of the ‘Risk Register’ page title in the upper left corner of the page.
Note: If no risks have been added to the register (meaning your risk register contains no data), your export will only contain the header columns.
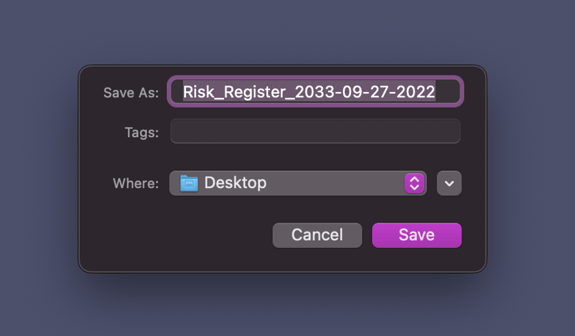
- Once you have generated an export of your register, choose where you would like the file to be saved within the pop-up window and click ‘Save’ to submit your entries.
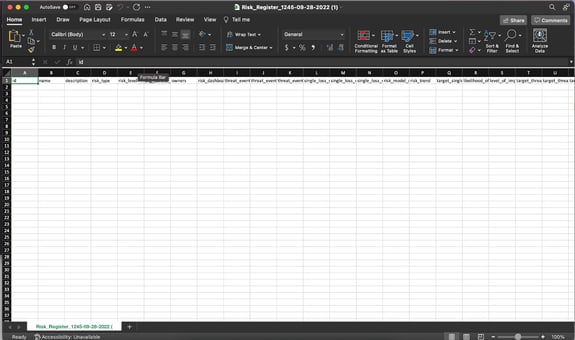
The resulting CSV file will include all data fields for each risk within your risk register - including name, description, risk type, average control score, etc. - as shown below: